老师,能帮我看一下目前代码又什么可以改进的吗,有些地方和效果图不一样。
html:
<!DOCTYPE html>
<html>
<head>
<title></title>
<link rel="stylesheet" type="text/css" href="css/index.css">
</head>
<body>
<div class="header">
<div class="top">
<a href="#"><img src="images/logo.png" alt="logo"></a>
</div>
<div class="nav">
<ul>
<li><a href="#">HOME</a></li>
<li><a href="#">ABOUT</a></li>
<li><a href="#">GALLERY</a></li>
<li><a href="#">FACULTY</a></li>
<li><a href="#">EVENTS</a></li>
<li><a href="#">CONTACT</a></li>
</ul>
</div>
</div>
<div class="main">
<div class="top">
<img src="images/banner3.jpg" alt="banner">
</div>
<div class="topLayer">
</div>
<div class="topLayer-top">
<form>
<input class="a1" type="text" id="" name="" placeholder="your Name"/><br>
<input class="a1" type="text" id="" name="" placeholder="your Phone"/><br>
<input class="a1" type="text" id="" name="" placeholder="your Email"/><br>
<input class="a2" type="text" id="" name="" placeholder="Writer Your Comment Here"/><br>
<input type="button" value="SEND MESSAGE">
</form>
</div>
<div class="middle"></div>
<div class="bottom"></div>
</div>
<div class="footer">
</div>
</body>
</html>
css:
*{
margin:0;
padding:0;
}
.header{
width:100%;
height: 70px;
background-color:#07cbc9;
}
.header .top{
float:left;
padding-left: 130px;
padding-top:15px;
}
.header .top img{
width:200px;
height:40px;
}
.header .nav{
float:right;
}
.header .nav ul{
margin-right:70px;
}
.header .nav ul li{
float:left;
padding-left:20px;
padding-right:16px;
box-sizing: border-box;
list-style: none;
height:70px;
line-height: 70px;
font-size:13px;
font-weight: bold;
color:#ffffff;
}
.header .nav ul li:hover{
background-color: #000;
}
.header .nav ul a:link{
text-decoration: none;
color: white;
}
.main .top{
width:100%;
height:500px;
}
.main .top img{
width:100%;
height:500px;
}
.main .topLayer{
width:100%;
height: 500px;
top:70px;
left:0px;
position: absolute;
background-color: #000;
opacity: 0.5;
}
.main .topLayer-top{
width:500px;
height:350px;
top:320px;
right: 50%;
position: absolute;
margin-top:-175px;
margin-right: -250px;
z-index: 2;
}
.main .topLayer-top .a1{
width:400px;
height:30px;
margin-top:20px;
margin-left:50px;
}
.main .topLayer-top .a2{
width:400px;
height:100px;
margin-top:20px;
margin-left: 50px
}
.main .topLayer-top input{
outline: none;
background: transparent;
}
input::-webkit-input-placeholder{
color: white;
}
.main .topLayer-top input[type="text"]{
color: white;
border: 1px solid white;
}
.main .topLayer-top input[type="button"]{
width:100px;
height:30px;
margin-top:25px;
margin-left:200px;
font-size: 10px;
color:white;
border: 1px solid white;
}
.main .topLayer-top input[type="text"]:hover{
border-color: #07cbc9;
}
.main .topLayer-top input[type="button"]:hover{
border:none;
background-color: #07cbc9;
}
正在回答

同学你好!
这一次整体的布局完成的很好,很清晰,接下来我们一起来分析一下定位的问题:
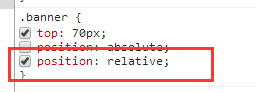
首先banner区上面的表单和遮罩层都需要使用绝对定位来定位到div.banner上面,根据之前所学的知识,如果子元素要相对于父元素定位,父元素应该设置为相对定位,子元素设置为绝对定位。因此在这里我们给父元素设置相对定位,然后子元素相对于父元素的左上角位置进行定位。修改后的代码:
将div.banner设置为绝对定位
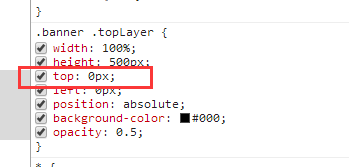
由于遮罩层是相对于父元素进行定位,所以这里将top设置为0即可
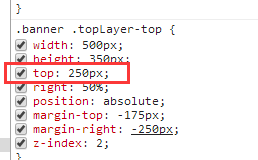
通过上面的设置布局已经可以很好地展现了,接下来可以将form表单在div.banner上向上移动一点会更好,因此减小top的值


如果我的回答解决了你的疑惑,请采纳,祝学习愉快~

HTML:
<!DOCTYPE html>
<html>
<head>
<title></title>
<link rel="stylesheet" type="text/css" href="css/index.css">
</head>
<body>
<div class="header">
<div class="top">
<a href="#"><img src="images/logo.png" alt="logo"></a>
</div>
<div class="nav">
<ul>
<li><a href="#">HOME</a></li>
<li><a href="#">ABOUT</a></li>
<li><a href="#">GALLERY</a></li>
<li><a href="#">FACULTY</a></li>
<li><a href="#">EVENTS</a></li>
<li><a href="#">CONTACT</a></li>
</ul>
</div>
</div>
<div class="banner">
<div class="top">
<img src="images/banner3.jpg" alt="banner">
</div>
<div class="topLayer">
</div>
<div class="topLayer-top">
<form>
<input class="a1" type="text" id="" name="" placeholder="your Name"/><br>
<input class="a1" type="text" id="" name="" placeholder="your Phone"/><br>
<input class="a1" type="text" id="" name="" placeholder="your Email"/><br>
<input class="a2" type="text" id="" name="" placeholder="Writer Your Comment Here"/><br>
<input type="button" value="SEND MESSAGE">
</form>
</div>
</div>
<div class="ABOUT">
<div class="a-top">
<div class="com1">
ABOUT<br>
</div>
<div class="com2">
</div>
<div class="com3">
Lorem Ipsum is simply text of the printing and typesetting<br>industy.Lorem Ipsum has been the industry's standard dummy<br>text ever since the 1500s.
</div>
</div>
</div>
</body>
</html>
CSS:
*{
margin:0;
padding:0;
}
.header{
width:100%;
height: 70px;
top:0px;
left:0px;
position:fixed;
background-color:#07cbc9;
z-index: 3;
}
.header .top{
float:left;
padding-left: 130px;
padding-top:15px;
}
.header .top img{
width:200px;
height:40px;
}
.header .nav{
float:right;
}
.header .nav ul{
margin-right:70px;
}
.header .nav ul li{
float:left;
padding-left:20px;
padding-right:16px;
box-sizing: border-box;
list-style: none;
height:70px;
line-height: 70px;
font-size:13px;
font-weight: bold;
color:#ffffff;
}
.header .nav ul li:hover{
background-color: #000;
}
.header .nav ul a{
text-decoration: none;
color: white;
}
.banner{
top:70px;
position: absolute;
}
.banner .top{
width:100%;
height:500px;
}
.banner .top img{
width:100%;
height:500px;
}
.banner .topLayer{
width:100%;
height: 500px;
top:70px;
left:0px;
position: absolute;
background-color: #000;
opacity: 0.5;
}
.banner .topLayer-top{
width:500px;
height:350px;
top:320px;
right: 50%;
position: absolute;
margin-top:-175px;
margin-right: -250px;
z-index: 2;
}
.banner .topLayer-top .a1{
width:400px;
height:30px;
margin-top:20px;
margin-left:50px;
}
.banner .topLayer-top .a2{
width:400px;
height:100px;
margin-top:20px;
margin-left: 50px
}
.banner .topLayer-top input{
outline: none;
background: transparent;
}
input::-webkit-input-placeholder{
color: white;
opacity: 0.5;
}
.banner .topLayer-top input[type="text"]{
color: white;
border: 1px solid white;
}
.banner .topLayer-top input[type="button"]{
width:100px;
height:30px;
margin-top:25px;
margin-left:200px;
font-size: 10px;
color:white;
border: 1px solid white;
opacity: 0.8;
}
.banner .topLayer-top input[type="text"]:hover{
border-color: #07cbc9;
}
.banner .topLayer-top input[type="button"]:hover{
border:none;
background-color: #07cbc9;
}
.ABOUT .a-top{
width:100%;
}
.ABOUT .a-top .com1{
font-size: 40px;
text-align: center;
font-weight: bold;
margin-top: 100px;
}
.ABOUT .a-top .com2{
background-color:#07cbc9;
width: 40px;
height: 2px;
margin:15px auto;
}
.ABOUT .a-top .com3{
font-size:15px;
text-align: center;
color:gray;
}


- 参与学习 人
- 提交作业 1088 份
- 解答问题 10204 个
如果你有Java语言基础,又想以后从事Java Web开发,那么本路径是你的不二选择!本路径从网页搭建开始入手,通过大量案例来学习Java Web基础。定能助你完成Java Web小白的蜕变!
了解课程


恭喜解决一个难题,获得1积分~
来为老师/同学的回答评分吧
0 星